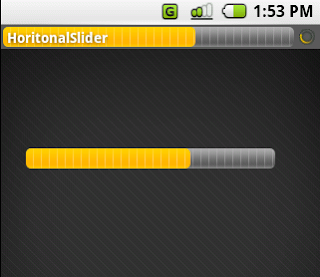
In this tutorial we'll create a custom View called HorizontalSlider based on ProgressBar. This slider will allow the user to move the slider back and forth on the screen and get notified when this happens.

Creating an interface
First think we'll want to do is create an interface to use to notify our Activities when a user changes the value of the slider. We'll call this interface OnProgressChangeListener to match the naming conventions of some of the other interfaces used in Android. Here is our interface:
17.
public interface OnProgressChangeListener {
18.
void onProgressChanged(View v, int progress);
19.
}
Interfaces do not do anything, they just create an outline that you must use to implement an object later.
Creating the view
Creating the view in this case is very easy. All that we must do is create a class that extends ProgressBar. After we create this class we will just need to override the constructors and the onMotionEvent() method.
Tip:To override the constructors in Eclipse you can right click in the class's block and hit Source->Generate Constructors from Superclass
All that we must do in the constructors is set our progress bar's background to be the progress_horizontal drawable that is built into android, this will make it a horizontal progress bar instead of the circular one.
Here is the HorizontalSlider class:
11.
public class HorizontalSlider extends ProgressBar {
12.
13.
private OnProgressChangeListener listener;
14.
15.
private static int padding = 2;
16.
17.
public interface OnProgressChangeListener {
18.
void onProgressChanged(View v, int progress);
19.
}
20.
21.
public HorizontalSlider(Context context, AttributeSet attrs,
22.
Map inflateParams, int defStyle) {
23.
super(context, attrs, inflateParams, defStyle);
24.
}
25.
26.
public HorizontalSlider(Context context, AttributeSet attrs,
27.
Map inflateParams) {
28.
super(context, attrs, inflateParams, android.R.attr.progressBarStyleHorizontal);
29.
30.
}
31.
32.
public HorizontalSlider(Context context) {
33.
super(context);
34.
35.
}
36.
37.
public void setOnProgressChangeListener(OnProgressChangeListener l) {
38.
listener = l;
39.
}
40.
41.
@Override
42.
public boolean onTouchEvent(MotionEvent event) {
43.
44.
int action = event.getAction();
45.
46.
if (action == MotionEvent.ACTION_DOWN
47.
|| action == MotionEvent.ACTION_MOVE) {
48.
float x_mouse = event.getX() - padding;
49.
float width = getWidth() - 2*padding;
50.
int progress = Math.round((float) getMax() * (x_mouse / width));
51.
52.
if (progress < 0)
53.
progress = 0;
54.
55.
this.setProgress(progress);
56.
57.
if (listener != null)
58.
listener.onProgressChanged(this, progress);
59.
60.
}
61.
62.
return true;
63.
}
64.
}
First we include our interface as a member class of this view. Then we setup the 3 constructors, having the second one pass in a style for the horizontal progress bar.
Next we create a function setOnProgressChangeListener() so that when you use this code you can use the interface created above to monitor changes in the progress level. We'll save this to our private variable named "listener".
Now, all the work happens starting on line 42 in our onTouchEvent() class. This class is notified when the user is clicking or dragging a click.
This method is pretty simple, we just calculate what the progress is based on the width of the progress bar and the x value for the click. I have created a static paddedPixels variable that will offset our clicks and widths because there is about 2 pixels of unused space on each side of the bar.
After we set our progress we can also call our OnProgressChangeListener's onProgressChanged() method to notify interested parties that the progress has changed.
On the next page we'll figure out how to use this new object.
Using HorizontalSlider
You can use HorizontalSlider just like any ProgressBar. In this example I'm going to utilize the new ProgresBar that is built into the title of the application and a HorizontalSlider. When the user clicks to change the HorizontalSlider value I'll update the ProgressBar in the title to show that it's working. Here is the main.xml layout I've used for this example:
1.
2.
9.
10.
16.
17.
Now, we can create a simple Activity for this layout. Here is SliderTest.java:
10.
public class SliderTest extends Activity {
11.
12.
private HorizontalSlider slider;
13.
14.
@Override
15.
public void onCreate(Bundle icicle) {
16.
super.onCreate(icicle);
17.
18.
requestWindowFeature(Window.FEATURE_PROGRESS);
19.
setContentView(R.layout.main);
20.
setProgressBarVisibility(true);
21.
22.
slider = (HorizontalSlider) this.findViewById(R.id.slider);
23.
slider.setOnProgressChangeListener(changeListener);
24.
}
25.
26.
private OnProgressChangeListener changeListener = new OnProgressChangeListener() {
27.
28.
public void onProgressChanged(View v, int progress) {
29.
setProgress(progress);
30.
}
31.
32.
};
33.
}
In our onCreate() function we request that the title progress bar feature is enabled with the requestWindowFeature() method. Then all we have to do is create a OnProgressChangeListener for the slider and update the progress bar from there!
You can do anything you want with custom views, in this case it was a very simple change to a built in view, but don't limit yourself to the ones that were handed to us.
No comments:
Post a Comment